- If you have already installed Nvidia DCH ( Declarative, Componentized, Hardware) driver, you have to uninstall it with Nvidia default uninstaller then proceed with DDU ( Display Driver Uninstaller ) to clean the system from the DCH driver completely . You can download DDU from here.
- After download complete, run DDU and allow it to reboot windows to safe mode and run DDU in safe mode for absolute stability.
- After you uninstalled the DCH version, go to this page https://www.nvidia.com/Download/Find.aspx?lang=en-us# to download the Nvidia Standard driver. Choose Standard in Windows Driver Type, please note that the standard version is only available for Windows 10 x64-based system. And it's recommended to use the Recommended/Certified driver version.

- Hold windows button (⊞ Win)and push R button, type "sysmdm.cpl" in the run box and press enter.
- Click on Hardware tab, then click on Device Installation Settings. Click No option to disable automatically update driver, then hit the Save Changes button.

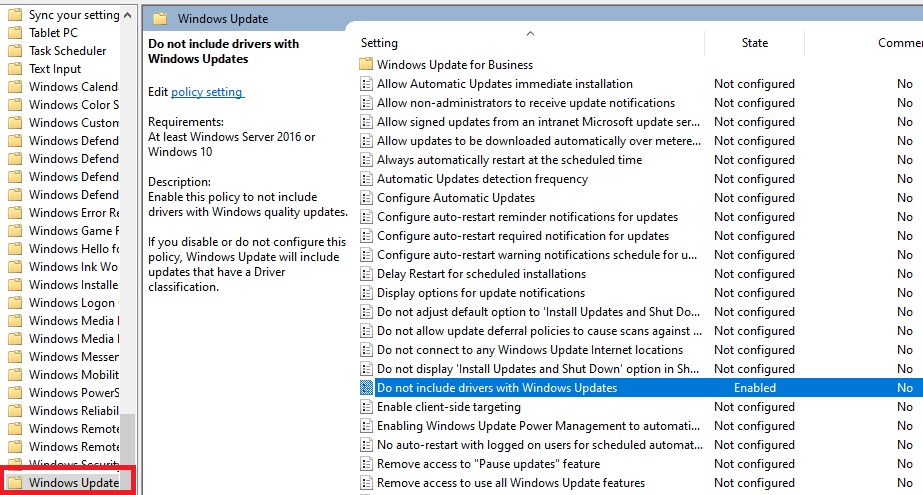
- Go to "Computer Configuration > Administrative Templates > Windows Components > Windows Update", then enable "Do not include drivers with Windows Updates" option.
- After you disable driver update, now you can install Nvidia Standard driver safely without loosing Nvidia control panel.
Method Two :
- Download Nvidia Control Panel Appx from here : Nvidia Control Panel Appx. Extract Nvidia Control Panel Appx file using Winrar.
- Go to folder option in file explorer, then choose "Show Hiden files, folders and drives" and uncheck "Hide protected operating system files (Recommended)".

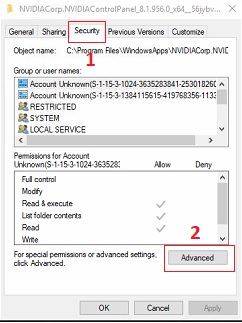
- Go to "C:\Program Files\Windowsapps". Right click "NVIDIACorp.NVIDIAControlPanel_8.1.956.0_x64__56jybvy8sckqj" folder and choose properties, then go to Security tab and click Advanced.

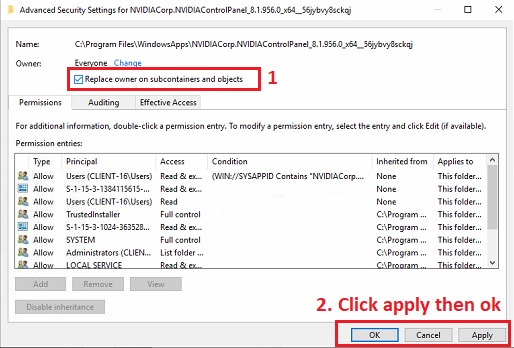
- Check "Replace owner on subcontainers and objects", then click apply and hit OK.
- Right click the folder again and choose properties, the go to Security tab and click on Advanced button. Check "Replace all child object permission entries with inheritable permission entries from this object", then click on "Disable inheritance" button. Choose "Remove all inherited Permission from this object".

- Click the Add button, then type everyone on "Enter the object name to select". Click "Check Names" button and hit OK.

- Check all basic permission and hit OK.

- Last, click apply and choose yes. Then hit OK.

Source : https://www.extremetech.com/gaming/309487-how-to-download-the-nvidia-control-panel-without-the-microsoft-store
No comments:
Post a Comment